
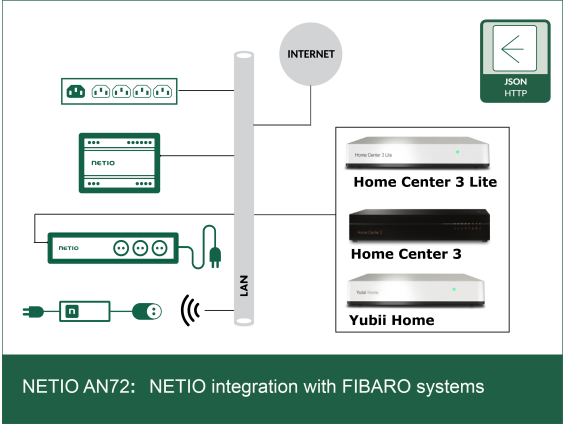
We decided to streghten possition in residetial segment of integration. NETIO PDUs can be easily and directly control from FIBARO Gateways by using NETIO driver . The NETIO device can export electrical & connection values into FIBARO Gateway - such power, connection, IP Address, Mac Address, serial number, power ports numbers, voltage, total energy, frequency etc.
All types of NETIO devices can be integrated:
- PowerBOX - with all kind of sockets
- PowerPDU - with IEC C13 computer power sockets
- PowerDIN - rail version
- PowerCable - FLAT PDUs for installation behind TV.
- Integrated NETIO devices shall be running with FW 4.0.0+
FIBARO gateway can control NETIO Outputs:
- Output ON/ OFF
- Toggle
- Reset with defined delay
- Short ON/ OFF
FIBARO Gateways supporting integration:
- Yubii Home
- Home Center 3
- Home Center 3 Lite

FIBARO / NETIO setup guide
1. As first NETIO driver shall be install into FIBARO system - Yubii
2. At defined room enviroment at Yubii - Add device/Other device/ Upload file – select NETIO driver “Netio.fga”
3. Configure device IP Address based on NETIO device location. FIBARO is using the NETIO HTTP JSON API. Use same username/ password as define in NETIO device


4. Accordingly NETIO device will be added into defined room.
5. Click on adde Netio device “Eye symbol” & consequently click on “Create All Outputs and Input device” at device detail.


6. Additionally, all device outputs & inputs will be added to defined room.
7. Now on, you can control NETIO device details as complete unit or independently based on input output

Driver description & download
Important notes:
- You must enable the JSON API in the NETIO web configuration of the device. Navigate to "M2M API Protocols" - > "JSON API".
- Select "Enable JSON API".
- Select "Enable READ-WRITE".
- Set the username and password to be used in FIBARO gateway
Video Manual
See demonstration about adding NETIO device into FIBARO Yubii system.
FAQ
Is the NETIO FIBARO drives free of charge to download?
Yes, driver is available free of charge.
Can I use the NETIO Cloud in parallel to FIBARO connection?
Yes, NETIO Cloud service can be use as well.
Can I use NETIO Mobile app in parallel to FIBARO connection?
Yes, NETIO Mobile app can be use as well.
Is there any limit for NETIO devices being added into FIBARO SW? (Yubii, HC3, HC3 Lite)
We have tested up (of several devices) from single output till 8 outputs device. This may depend on the ecosystem (firmware version) of the hub. In HC3 without any limits for Netio devices, Yubii and HC3 lite can have max. 10 Netio devices as max.
Does connection support HTTPs communication?
Yes, HTTPs is supported